Figure 10.1 A Path card.

Several specialized stacks and utilities allow you to customize your use of Perseus. Use the Paths utility to create and follow paths through Perseus. The Notebook utility records your notes and searches or annotates Perseus resources for others. Current Assignment is a personal stack in which Perseus assignments, messages of the day or other information for a group of users can be posted. The CD Swapper is also a personal stack; it stores a number of image requests until you are ready to swap the current cd-rom. The four utilities above are found under the Perseus menu. Perseus Settings (overview in chapter 4.2.3, described in detail below), and Atlas Settings (described in chapter 7.2.3) are reached from the Settings icon on the Gateway. Atlas Settings are also reached from the Atlas menu. You may configure the display Primary Texts, both Greek and English, using the controls on the Utility Bar and the Text Menu within Primary Texts (described in chapter 8.2 and 8.3).
A stack cannot be duplicated while it is active, i.e., currently in use by Perseus.

Figure 10.1 A Path card.
It is essential that the Path stacks be on your hard drive, not the cd-rom, in order for any changes to be recorded.
The current Path stack is the one in effect during your Perseus session. To choose the current Path stack, go to the Gateway and click the Settings icon. The Settings card will appear (figure 10.2).

Figure 10.2 Settings card.
If there is no current Path stack, it will be blank; it will display the current Path stack if one was chosen in a previous Perseus session. Figure 10.2 shows a current stack Paths in a folder Local Stacks in a folder Perseus 2.0 in the hard disk Elli's Hard Disk. The Path stack which you select under Settings will remain the current Path stack until you change it through the Settings utility.
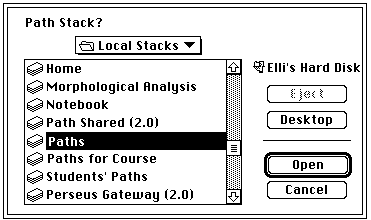
When you click the Path Stack button, a file dialog window appears (figure 10.3).

Figure 10.3 Path Settings file dialog window.
Open the file containing the desired Path stack, select the desired stack, click Open, and this choice will remain the current Path stack until another one is chosen.
The stack simply named "Paths" contains the Guided Tours and other Paths that are distributed with Perseus 2.0.
We suggest that if you wish to follow a Path submitted on a floppy disk, you first copy it to your Local Stacks folder.

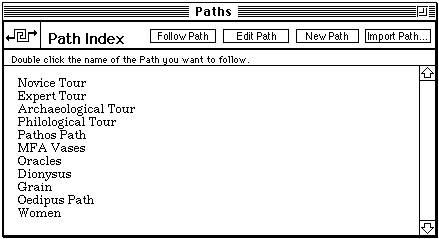
Figure 10.4 Path Index listing the ready-made Paths distributed with Perseus 2.0.
The buttons at the upper right-hand corner of the Path Index provide four utilities: Follow Path, Edit Path and New Path and Import Path.
Do not follow the above procedure to import Paths from Perseus 1.0. Conversion of version 1.0 Paths is described in section 10.2.7.
Choose a Path to follow from the Path Index. (To go to the Path Index, click the Paths icon on the Gateway or choose the item Path Index from the Perseus menu.) Select a Path and click the button Follow Path (or double-click the Path you wish to follow). Perseus will take you to the first Location on the Path.
The control used to go forward and backward along a Path, and to create new Locations on the Path, is the Path Navigator on the Navigator Palette. The active points on the Path Navigator icon are depicted below (figure 10.5).

Figure 10.5 Path Navigator icon.
When you are walking a Path, click the right arrow on the Path Navigator icon to go to the next Path Location. Click the left arrow on the Path Navigator icon to go to the previous Path location.
As you follow a Path, you may wish to investigate something that causes you to leave your Location on the Path. If you decide to add the new Location to the path, follow the instructions below. If you wish to return to the Path, choose Current Path Location from the Perseus menu. If you wish to continue on the Path, click the right arrow on the Path Navigator to go to the next Location.
Feel free to leave the Path at any time to explore the Perseus environment on your own. To rejoin the Path where you left it, choose Current Path Location from the Perseus menu. However, if you quit Perseus, you must again choose a Path to follow according to the instructions in this section.
To create a Path, go to the Path Index by clicking the Paths icon on the Gateway (or from anywhere within Perseus, choose the item Path Index from the Perseus menu.)
The Path Index appears (figure 10.4). Click the button New Path, upper right.
A blank Path card appears (figure 10.6).

Figure 10.6 New Path card.
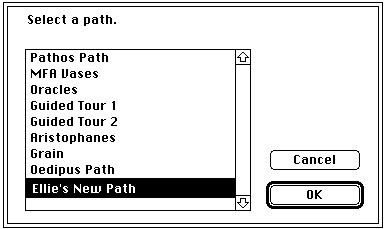
As you travel around in Perseus, you can add Locations to your Path by clicking the center of the Path Navigator icon. In response, a dialog box appears asking you to select a Path (figure 10.7).

Figure 10.7 Dialog window to add Location to Path.
A second dialog window appears asking you to name the Path Location (figure 10.8).

Figure 10.8 Dialog window to name Path Location.
Please read the section "Path Card" below to find out how to edit and annotate your Path.
Almost every location in Perseus can be made into a Path Location except the Thumbnail Browser, the Sources Used Index and the Tools and References Index.
A typical Path card is depicted below (figure 10.9). Each Path card can contain up to twenty-seven locations. The locations are shown by icons indicating the Perseus resource in which they are located--for example, Primary Texts and the Atlas. A note describing the Path may be added, lower left, and notes for each stop may be added, lower right.

Figure 10.9 Path card
A dialog box appears requesting you to confirm the deletion of this path.
Click Delete if you wish to delete the path. If you have changed your mind or made a mistake, click Don't Delete.
There is a protection mechanism in Perseus that prevents you from deleting a path if it is the only remaining path left in the current stack. If you attempt to delete this path, a dialog box appears with the message "Can't delete last card of protected background."
The name of the Path is selected when you first see the card. You can change the name to indicate its contents simply by typing a new name.
The Rename feature is available only when Rearrange mode (below) is off.
The Delete feature is available only when Rearrange mode (below) is off.
The Go There feature is available only when Rearrange mode (below) is off.
Click the button Rearrange, middle left, to put the Path card into Rearrange mode. An X appears in the check box next to Rearrange, and the three buttons to the right--Rename, Delete, Go There--disappear. In Rearrange mode, each Location icon can be dragged around the Path card.
Drag the locations into a new arrangement just as you would drag any Macintosh icon.
You do not have to drag the icons to the exact positions where you want them to end up. Positions are relative. If you drag an icon below or to the left of the rest of the icons, it becomes the last one. When you leave Rearrange mode, the icons realign.
Click Rearrange a second time to save the locations in the new arrangement. The check box no longer has an X in it.
You must finish rearranging by clicking Rearrange to deselect it before you can do anything else to the Path. If you decide to leave the Path card or perform other functions, the Path card will take a minute to finish the rearrangement automatically, displaying a dialog box with the message "Have to finish rearranging."
Names may not exceed twenty-four characters. Paths can also be renamed from the Path Index.
Click the About this Path field to make the insertion point appear.
Type comments or instructions into the box.
When you click a location, the title of this field changes to Notes For, followed by the name of the selected location. Any pre-existing notes for that location appear in the field.
The annotations for a location also appear when you are following a path. When you arrive at a location, its note appears in a floating window that can be closed or repositioned on the screen.
You may create or edit the annotation for a location by typing in the Notes field at the lower right-hand corner of the card, or by editing the annotation when it appears in a floating window as you are following a path. Be careful not to edit the first line of the annotation, which has the path name and location number.
You can copy and paste annotations into the Path Note field or window from a word processing application outseide of HyperCard. Be aware, however, that any text formatting (tabs, italics, etc.) will be lost, and that the note will show up as plain text in Perseus.

Figure 10.10 Path items in Perseus menu.
In order to effect the conversion, your copies of both Perseus 1.0 and HyperCard 2.0 or better must be properly installed on your computer. Please see the documentation for Perseus 1.0.
Copy the folder Path Converter from Perseus 2.0 Disk 1 cd-rom to your hard disk. You may find it convenient to copy the Path Converter folder into the Perseus 1.0 Install Me folder.
Quit from Perseus 2.0, if you have it running, load the Perseus 1 cd-rom and launch Perseus 1.0 by double-clicking the version 1.0 Gateway.
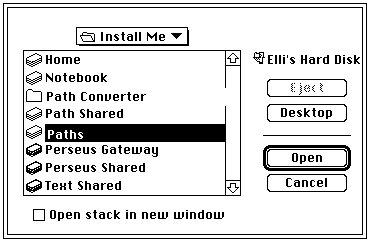
You will now be opening a new HyperCard stack from the Perseus 1.0 Gateway. Choose the item Open Stack from the File menu. A file dialog window appears (figure 10.11).

Figure 10.11 Open Stack file dialog window.

Figure 10.12 Path Converter.
Step 1. To choose the version 1.0 Path you wish to convert, click the button Choose Old Path Stack. From the file dialog window, select the stack you wish to convert, and click Open. In figure 10.13 the stack "Paths" containing the two Guided Tours has been selected. The name of the stack will appear in the field to the right of the Choose Old Path Stack button.

Figure 10.13 File dialog window from button Choose Old Path Stack.
Step 3. To choose the location of the converted Path stack, click Choose New Path Stack. You may find it convenient to choose the folder Local Stacks, which contains other Perseus 2.0 stacks.
Step 4. To begin the conversion, click Convert Path.
You may now convert another Path, or quit HyperCard.
Because of the limitations of HyperCard, some Locations on the old Path may not convert, for example, Kewords in the Browser.
Please read section 10.1 for directions on personalizing your Notebook stack.
The Notebook stack consists of a Notebook Index that lists the several Note cards in that Notebook. Like any other Perseus card, Note cards can be added to a Path.
The Notebook Index contains a list of the names of all Note cards in your Notebook stack. You can see all your Note cards from this Index. Figure 10.14 shows the Note card distributed with Perseus 2.0.
From the Notebook Index, you can create new notes, rename notes, or delete notes. The buttons at the upper right-hand corner of the Notebook Index provide access to four utilities: Rename Note, Delete Note, Go to Note, and New Note.

Figure 10.14 Notebook Index.
You can also go directly to a note by double-clicking it on the Notebook Index.
You should now be looking at a new card whose name is Note, followed by the time and date this card was created. If a Note name was selected when you clicked this button, the selection will be ignored.
The name of the Note is selected when you first see the card. You can change the name to indicate its contents simply by typing a new name. You can also rename a Note from the Notebook Index, see below.
A dialog box appears requesting you to name the Note. Type a new name for the note and click OK.
Click Delete Note.
A dialog box appears requesting you to confirm the deletion of the Note.
Click Delete if you wish to delete the note. If you have changed your mind or made a mistake, click Don't Delete.

Figure 10.15 Note card
The name of the Note is selected when you first see the card. You can change the name of the card to indicate its contents simply by typing a new name.
Click Delete if you wish to delete the Note. If you have changed your mind or made a mistake, click Don't Delete.
Here are some features of the Notebook card in addition to the three buttons described above.
Names may not exceed twenty-four characters. Notes may also be renamed from the Notebook Index.
You may cut, copy, and move text on a Note card using the tools under the Edit menu.
Note that HyperCard is not intended for use as a word processing application. The Tab key does not indent in HyperCard, it selects fields. Formatting (italics, fonts, etc.) is not saved when text is copied from HyperCard into a word processing application.

Figure 10.16 Search Saver results.

Figure 10.17 Search Saver to Notebook.
If you will be swapping cd-roms, please be sure to turn off File Sharing in the Control Panels of your Macintosh. Otherwise the Mac will not eject the cd.

Figure 10.18 The CD Swapper
Thus, for example, if you are looking a a vase from the Yale University Art Gallery on Disk 3, you must swap cd-roms if you want to link with the text of the Odyssey on Disk 1. Alternatively, you may choose to store or cancel your request.
With the CD Swapper, requests are stored and recalled by disc number. For example, if Perseus Disk 1 is currently in the cd-rom drive, and you have stored a number of image requests in the CD Swapper stack, you can open the CD Swapper at a convenient time to recall the image requests and insert the appropriate cd-rom.
The CD Swapper stack, like the Paths and Notebook stacks, is a stack that can be privately maintained by the user, an advantage in a setting where Perseus is shared with other users. By maintaining your own CD Swapper stack, you can store and recall image requests during different work sessions without mixing up your requests with those of other Perseus users.
Owners of the Concise Edition of Perseus 2.0 will still be prompted by the CD Swapper dialog box if the requested image is not on disc. If you have access to the Comprehensive Edition at the University (for example), you can bring your CD Swapper stack in on a floppy disk for later research.
The images on the cd-roms are organized in folders according to image numbers. Each folder has a set of related images. See the Appendix for the contents of the folders.
NOTE: If you are using Perseus on a network or have stored all of Perseus on a gigabyte hard drive, the CD Swapper will not be necessary because all images will be available.

Figure 10.19 CD Swapper dialog box.
If you choose to swap cd-roms now, the current cd-rom will be ejected from the drive. You must insert the appropriate cd-rom in the drive, then click the item you desire to link with fromthe list of requests in the CD Swapper.
To find a stored image request for an offline cd-rom, you must previously have stored an image request: with Disk 1 in the cd-rom drive, release the mouse on the item Vases under the Links menu. Bring up the Vase Index by Collection. Click Berlin,Antikenmuseen. Click Berlin F 1090 on the right. Select an image from the Vase Catalog card, and the CD Swapper dialog window will appear. Click Store Request.
Open the CD Swapper by choosing it from the Perseus menu. Perseus will ask you to choose the current CD Swapper stack.
The four discs are listed at left. At right is a list of stored image requests for one of the cd-roms.
Each cd-rom shows a status of being offline or online. There are also three buttons, Eject Disk, Show List, and Clear List. Eject Disk causes the appropriate cd-rom to eject from the drive. Show List displays the list of stored image requests for the selected cd-rom. Clear List deletes the stored image requests for the selected cd-rom.
Click a line in the list of image requests. You will be asked to insert the appropriate disk. Once you do so, the image will appear.
You can personalize your CD Swapper stack by duplicating and renaming it. We suggest that you name the stack appropriately, for example, Elli's CD Swapper.

Detailed configuration settings are accessible from the main Settings utility, reached by clicking the Settings icon on the Perseus Gateway. The Settings utility enables you to choose which stack Perseus will use as the current Path stack, Notebook stack or CD Swapper stack. The Settings utility offers a choice of using video images from the videodisc and/or digital images from the cd-rom volumes. You can use one or both types of images, if your hardware configuration includes a videodisc player. Settings also lets you identify the videodisc player in your configuration.
If you will be using the digitized cd-rom images, it is no longer necessary to use the Settings utility when you first install Perseus. The Path stack, Notebook stack and CD Swapper stack distributed with Perseus 2.0 are by default the current stack on startup, and they will remain so until you change them. The configurations offered by the Settings utility dealing with images are, for the most part, optional. You must change the current Settings only if you wish to change the configuration of your computer and monitor.
The Perseus Gateway is an unlocked stack (a locked stack is indicated by a small lock icon at the far right of the menu bar). Therefore, any user may change the Settings. A troubleshooting tip is to check the Settings if you share the Gateway with other users.

Figure 10.20 Perseus Settings Card
In figure 10.20, the Path Stack specification instructs Perseus to look for the Path stack Paths in the folder Local Stacks on Elli's Hard Disk. Similar specifications obtain for the Notebook Stack and the CD Swapper stack.
When you first install Perseus, the default Path and Notebook and CD Swapper stacks are those distributed with the Perseus cd.
> Change Path Stack
Click the box to the right of Path Stack. A directory dialog box appears for you to identify the file location of the Path stack you wish to make current. Select the desired stack and click Open. Repeat the procedure to change the Notebook and CD Swapper stacks.
You may wish to copy and rename the Path, Notebook and CD Swapper stacks to create custom stacks. By renaming these stacks, you can distinguish your Paths and Notebooks from those of other users. If several people are using Perseus at one time, a stack being used by more than one person cannot be changed. Being able to change and annotate the Path and Notebook stacks is very important if you use these features. Copy and rename these stacks as part of your software installation (do this on the Macintosh desktop).
You may use the videodisc images, the digitized images, or both sources. You must turn on the setting to use videodisc images before you can activate the pop-up menu for player type.
To load the appropriate settings for your videodisc player, choose one of the player names from the pop-up menu Select Player Type.
If no videodisc player is connected to the Macintosh, the pop-up menu will be inactive.
Perseus 2.0 supports the following videodisc players: Hitachi 9550, Pioneer 4200, Pioneer 6000A, Pioneer 6010A, Sony LDP 1200, Sony 1500, Sony 2000. The name of the player selected appears on the pop-up menu.
The setting below Use Digital Images is a selection for Indexed Color. Digital images are displayed according to the capacity of your monitor and the settings in the Monitor Control Panel (in the Apple menu). Although Perseus images are 24-bit images, they can be displayed in 8-bit color through the application of a color look-up table (CLUT), or an index of 256 colors that best represent the image in an 8-bit environment. The default setting is to have indexed color on, regardless of the color depth of your monitor. The ability to turn indexed color off simply anticipates future advances in color display technology.
Going to cards in the same window means that your previous location in Perseus is replaced by the card of the new location. No layering of windows occurs.
Either setting can be temporarily reversed by pressing the Shift key while clicking the mouse or choosing a menu item. For example, as you read a primary text you may wish to analyze a word while keeping your primary text location in a background window. If the setting is to go to cards in the same window, press the Shift key when you click Analyze, and the Morphological Analysis of the selected word will appear in a new window.
Card 1 - Gateway
Card 2 - Atlas Settings. Use to save changes in the Atlas configuration.
Card 3 - Main Settings. Covered above.
Card 4 - Perseus Movie Settings. Covered below.
Card 5 - Perseus Link Database. Do not change.
Card 6 - Perseus Database. For customized installations.
Card 7 - Perseus State of the World. Do not change.
Card 8 - Known bugs. Bugs known to be in this version due to software problems.
From the Gateway, click the Forward and Backward arrows on the Navigator Palette to go to these cards.
Perseus will not operate with the Gateway stack locked. Thus, the data on these cards is not tamper-proof. If any of the data is lost, you can always copy a new Gateway stack from the Local Stacks folder on Perseus Disk 1.
Unlock the card by clicking the button Edit Settings. A dialog window appears asking if you are sure you want to make the change. If so, click Yes. If you are not sure that your computer has adequate memory for the large Thumbnail Browser, click the Advise button, and Perseus will advise you. Click the button Large Thumbnails. Please be sure to click the Lock Settings button before leaving the card.
> Change the locations where QuickTime movies are kept. (For network administrators.)
The Thumbnail images are built from so-called QuickTime movies, although there is no cinematography involved. Unlock the card by clicking the button Edit Settings. A dialog window appears asking if you are sure you want to make the change. If so, click Yes.
Type the file path for the movie location in the field provided. Be sure to click the Lock Settings button before leaving the card.
You can name any stack in the Local Stacks folder Current Assignment and on the next startup of Perseus, that stack will appear as an item in the Perseus menu. If there is no stack which you have named Current Assignment, no such item will appear in the menu.
Because the user level under the Perseus Player is set to 4, you cannot create a new stack unless you do it under the HyperCard application set at user level 5. You can always rename any already-existing stack Current Assignment under the Finder.
You can make your Current Assignment stack somewhat tamper- (though not hacker-) resistant by locking the stack from the Get Info box in the Finder. When the stack is locked, its cards are read-only and cannot be deleted.