

Basic Macintosh and Hypercard terminology is covered in section 4.1. Descriptions of Perseus-specific buttons, menus and windows begin with section 4.2.

Figure 4.1 Types of buttons
The active choice in a pop-up menu is registered in one of three ways. One way is a check mark placed next to the choice in the pop-up menu. The second is that the choice now appears as the name of the pop-up menu. The third is an action that occurs as soon as you release the mouse button. A pop-up menu from a button is depicted below (figure 4.2). This menu allows you to set the type of videodisc player.

Figure 4.2 Pop-up menu
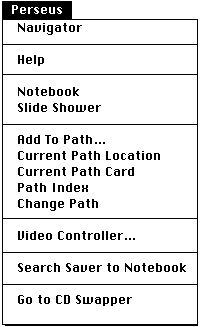
Figure 4.3 Perseus Menu.
Detailed explanations of the Links and Perseus menus are offered at the end of this chapter. Descriptions of specialized menus are included in the chapters describing the Perseus features that use them.
Perseus will warn you if your memory is running low because too many windows have been left open.
Only windows from different stacks can be seen at the same time; you cannot have two windows from the same stack open simultaneously.
Only one window is active at any time. The active window is shown at the forefront of other windows and has a striped title bar. Inactive windows have plain white title bars. Although you can open several windows, available RAM restricts the number of windows that can be open at any time. If you open too many windows, you may see a warning message, or, in extreme cases, the program may spontaneously quit.
Windows can accumulate on the screen and clutter the desktop. Close any windows you are not using. When only one Perseus window is open, its title bar does not have a close box.


Figure 4.4 Scroll windows with Pointer Hand and with Arrow in Black Rectangle.
> Click the black rectangle with the hand and then drag it to show a different region of the map.
> Click the black rectangle with the arrow and then drag it to the desired size. The size of the window display changes, reflecting the change in dimension of the black rectangle.
NOTE: You can bring up the scrolling window by pressing the key combination command-e, and put the scrolling window away again by again pressing command-e.
If you use the Navigator Palette while a photograph or illustration window is open, you may not notice that it is having an effect on the Perseus HyperCard resources. This is particularly true if you have opened a large photograph or illustration window that hides much of the screen behind it.

Figure 4.5 Perseus Gateway

This section provides an overview of Settings. For detailed instructions, please see chapter 10.5.
> Click the Settings icon to go to the Settings card.
Use the Settings function to customize your Perseus system. You can specify settings for a videodisc player, image displays, and the control of windows. For details on installation and set up procedures and information on how to run Perseus on a configuration other than the default single Mac/single cd-rom player, see chapter 2, sections 2 and 4.
NOTE: We can recommend only the videodisc players listed here and on the Settings card. Other models may not be compatible with Perseus. These models include Hitachi 9550, Pioneer 4200, Pioneer 6000A, Pioneer 6010A, Sony LDP 1200, Sony 1500, Sony 2000.
If you will be displaying images only on the computer monitor, click the box Use Digital Images.It is possible to display images from both the videodisc and the cd-rom at the same time. In this case, click both the Video Images and Digital Images boxes.
If your computer is running with an 8-bit color maximum, click the Indexed Color box. 8-bit color shows up as "256" in the Settings of selected monitor field in the Monitors control panel in your system folder
The button Go to cards in same window allows you to open a new stack in the current window, the new stack replacing the current stack. The advantage of opening cards in new windows is the ability to view several resources at once.
The Multiple Open Windows feature does not apply to image windows, which are a separate type of window that always open in addition to the stack window.

> If you have HyperCard installed in your system, click the Home icon to go to the Home card.
You may wish to go directly to the Home card when you are finished using Perseus if you plan to use HyperCard in another application. You can also go to the Home card to review and adjust your search paths for Perseus. Refer to chapter 2.5 for information on HyperCard and the Home stack.

Click the Paths icon to go directly to the Path Index. From the Path Index you may double-click any Path you wish to follow.

> Click this icon to learn about the Perseus Project, its funding, and other support.
An index lists entries for the Perseus Project and Annenberg/CPB Project, support information for using Perseus, and projects with topics related to Perseus.
> To quit Perseus 2.0, release the mouse on the item Quit under the File menu, or press command-q.
After some discussion, it was decided to replace the Quit icon (
 )
of version 1.0 with the Paths icon. Upon quitting, a dialog window will no
longer ask you to confirm your choice to quit. You can also quit Perseus from
anywhere in the program by pressing command-q.
)
of version 1.0 with the Paths icon. Upon quitting, a dialog window will no
longer ask you to confirm your choice to quit. You can also quit Perseus from
anywhere in the program by pressing command-q.

Figure 4.6 Navigator Palette.
> Make the Navigator Palette reappear by choosing Navigator from the Perseus pull-down menu.

The Search Saver is a new feature of Perseus 2.0 that lets you temporarily store the results of searches made with tools such as the Browser, the English Index, or the Philological Tools. The Search Saver icon on the Navigator Palette opens the Search Saver and stores the results of a new search. You can link to a citation in Perseus that is stored in the Search Saver by clicking on it.
Because the Search Saver window remains active and on-screen, there is no need to go back and forth between two Perseus resources when linking to search results, as had been necessary in version 1.0.
> Save the results of a search for the word  in Homer.
For this exercise, follow the instructions for Greek Word Search given in Section 3.1.2.
Be sure you have chosen Citations for all forms from the Options pop-up menu.
Save the search by clicking the Search Saver icon on the Navigator Palette. The citations are saved to a new floating window, the Search Saver (figure 4.7)

Figure 4.7 Search Saver.
Results loaded into the Search Saver may be copied to a Perseus Notebook for later use. This task is automated by choosing Search Saver to Notebook from the Perseus pull-down menu. For more details on this feature, see chapter 4.6 below.

Use Author Credits to correctly cite material from Perseus used in a paper or publication.
Where applicable, author credits for articles, descriptions and translations in Perseus are available by clicking the Information icon. If author credits are available, a card appears with information about the editions, sources, or the author, as well as other information about the stack. To return to your original location, click the Go Back icon, described below.
Author information on Primary texts is available at the text level; on Art and Archaeology stacks at the Catalog level; on the Encyclopedia at the article level; on the Atlas at the Small Outling Map level; on the Essays at the Table of Contents level; and on the Historical Overview at the text level.

Online help is available in Perseus 2.0 by clicking the Help icon on the Navigator. It is also available from the Perseus menu. When you click Help, Perseus opens the Help stack and presents information related to the current stack. Chapter 3.3 addresses the Help system in greater detail.

The Path Navigator icon allows you to navigate a path. This icon is a square maze with an arrow at either side, suggesting a meander through Perseus. The meander has three active components: the left arrow, the meander center, and the right arrow.
The left and right arrows are Previous Stop and Next Stop along the Path, respectively. Click them to go to the previous and next locations of the path you are following. The meander center is a Record button which allows you to add a location to the Path you are creating.
Instructions on following a pre-recorded Path in Perseus are in chapter 3.2. For complete information on creating Paths, see chapter 10.2

The Gateway icon places you at the main access point of Perseus, the Perseus Gateway. If you lose your bearings, you can always return to your starting point. From the Gateway, you can select any element of Perseus.


The left arrow on the Navigator takes you to the previous card in a stack, moving you backward in a linear fashion. For example, if you are in the Architecture stack and the current card is Olympia,Swimming Pool with Greek Baths, the left arrow will take you to the previous card of that stack, Olympia,Stadium. (Because of programming requirements, commas in a catalog title are not followed by a space.)
It is, therefore, not necessary to return to the Index level in order to proceed through the cards of a stack.
The right arrow on the Navigator takes you to the next card in a stack, moving you forward in a linear progression. For example, if you are examining the entry "Bell krater" in the Encyclopedia, the right arrow will take you to the next catalog entry in the Encyclopedia, "Bellerophon."
About Cards and Stacks: HyperCard organizes information electronically, analogous to a number of note card stacks. The sculpture data, for example, is stored in the cards of one stack, the text of Sophocles in the cards of another. The Go to Previous Card and Go to Next Card arrows take you to cards within the current stack. The Go Back arrow takes you to a location in a previous stack.

The Go Back (bent) arrow returns you to a card in a previous location - most often to the stack you were in before you entered the current Perseus resource. If you click the Go Back arrow several times in succession, you will retrace your steps backward. This is not the same as the Go to Previous Card arrow, described above.
Please be aware of the limitations of the Go Back feature. Because Perseus is large and complex, the Go Back feature does not always take you where you expect. An alternate method of retracing one's steps is to use the Go Recent feature of HyperCard. Choose Go Recent from the Go menu. A message window appears with thumbnail images of the windows previously accessed in the current HyperCard session. Click one of the thumbnails to return to that window.
The display of credits is often a condition of the agreement negotiated with a museum, artist or photographer to include a collection or work in Perseus. Accordingly, there is no provision for turning off the author credits.
Perseus resources have several different types of links. Links are implemented through buttons, text, and the Links Menu (figure 4.8). Using the Links Menu, you can move among the Perseus resources without returning to the Gateway.
When you have selected text in any part of Perseus and you then use the Links menu to go to a new resource, Perseus tries to look up the selected text in the resource you have chosen from the Links menu.

Figure 4.8 Links Menu.
If you want to search for all occurrences of a word or phrase anywhere in the English text of Perseus, use the English Index.
> Use Lookup to find the Perseus resources for the query "Castor and Pollux" and to resolve this phrase into its canonical Perseus reference.
Use whole words or phrases, not starting characters, as search strings in Lookup. If you want to search by starting characters, use the English Index instead.
Open the Lookup tool by choosing it from the Links menu. Type Castor and Pollux into the Lookup tool and press return.
You will see "dioskouroi" in the left column (figure 4.9). "Dioskouroi" is the canonical Perseus reference derived from the query "Castor and Pollux;" the names below the line are names associated with "Castor and Pollux" which Lookup recognizes.

Figure 4.9 Lookup Tool.
If the Lookup tool begins to fail or behave erratically, close it and reopen it from the Links menu.
> Use Lookup to undertake a more complex search, in which further canonical Perseus references are given.
Open the Lookup tool by choosing it from the Links menu. Type Hera into the Lookup tool and press return. Seventeen possible links having to do with Hera appear in the left ("Could be") column (Figure 4.10).

Figure 4.10 Lookup with results of clicking "charioteer" in left column.
Click charioteer, the fifth below hera in the left column. A list of Perseus resources appears in the right column. To go to an associated Perseus resource, click a line in the right column. In this case, results for charioteer appear in four resources: the Encyclopedia, as a Keyword in the Vase, Coin and Sculpture Catalogs, in the English Index, and in the English-Greek Word Search.
You may continue the Hera-charioteer search by clicking the line Keyword for Vases in the right column. This will take you to the Browser, which automatically makes the search for you (figure 4.11).

Figure 4.11 Clicking on Keyword for Vases in Lookup produces a Browser search.
Save the results for charioteer in the Search Saver by clicking the Search Saver icon on the Navigator Palette. To make a Keyword Search for Hera, find the pop-up menu of search topics at the top of the Browser and choose Keywords (figure 4.12). A pop-up menu of Keyword search topics is at the right; choose Divinities.

Figure 4.12 Vase Keyword Search for Hera.
Compare the list of charioteer vases stored in the Search Saver with the Hera vases in the Browser. Matching vases from the two lists are Cleveland 30.104, Florence 4209, and Munich 1437. You can go to the Catalog card for any of the vases by clicking on its name, either in the Browser or the Search Saver.
The direct Lookup feature does not apply to Perseus resources other than Primary Texts.
> Follow these steps to go to line 250 of Euripides's Medea .
Choose Lookup from the Links menu. A small floating window appears. Type Eur. Med. 250 and press Return.
NOTE: When you use the Lookup tool as a shortcut to Primary Texts, you must use specific abbreviations and formats for author's name, work, and book, chapter, section, or line reference. These are known as canonical Perseus references, and a complete lists are found in the Appendix of this User's Guide and in Online help under the topic Canonical Abbreviations for Primary Texts.
> Go to the card for the Doric Treasury at Delphi in the Architecture Catalog.
Choose Lookup from the Links menu. A small floating window appears. Type Delphi,Doric Treasury, thus: Delphi,Doric Treasury, and press return. Do not leave any spaces between Delphi, the comma and Doric. Now click Architecture Catalog in the right column.
Note that when you use Lookup as a shortcut to a particular building, coin, sculpture, site, or vase, you must use the exact title of the catalog entry, and that there is an extra step of clicking the desired item in the right column.
Primary Texts (8.1)
Architecture (6.3.3)
Coins (6.3.6)
Sculpture (6.3.4)
Sites (6.3.2)
Vases (6.3.5)
Atlas (7)
Encyclopedia (9.2)
Essays (6.2)
Historical Overview (6.1)
Bibliography/Sources Used (9.3)
Greek-English Lexicon (8.4.7)
A Perseus Tool is a software program written to access or organize the information in a Resource. The Tools found under the Links menu are:
Lookup (4.5.1)
Browser (5.1)
English Index (5.3)
Morphological Analysis (8.4.6)
Greek Word Search (8.4.8)
Greek Words in Proximity (8.4.9)
English-Greek Word Search (8.4.10)
Greek Dictionary Entry Search (8.4.11)
Greek Word Freqs -- Overview (8.4.12)
Greek Word Freqs -- By Author (8.4.12)
> Choose any resource or tool from the Links menu.
Using the Links menu to go to Perseus Resources and Tools is a shortcut for returning to the Gateway and clicking an icon.
If you know the exact form of a Perseus Catalog title or Catalog number, you can link with its card by selecting the text containing the reference, choosing the appropriate Resource from the Links menu. Perseus will look up the selected text in the resource you have chosen.
> Link with the Sculpture Catalog card for Kleobis and Biton from the Stewart essays on Greek sculpture.
Go to the Essays by clicking the Essays icon on the Gateway choosing Essays & Catalogs from the Links menu. Click One Hundred Greek Sculptors: Their Careers and Extant Works. A Table of Contents for the Stewart essays appears. Click 4.2.4.2 Hageladas of Argos. Select Kleobis and Biton from the second line of text. Choose Sculpture from the Links menu. Perseus will take you to the Catalog card for Kleobis and Biton.
This is an advanced technique, and will work only if the selected text is identical to the Perseus Catalog card title or number.
As described above in section 4.2, holding the shift key down during a navigational action will temporarily reverse the default setting for opening windows. When you press the Shift key as you choose a Links menu item, the new stack appears in an additional window, if the default setting is to open windows as a replacements of the current window. If the default setting is the opposite selection (to open in a new window rather than replace one), the new stack will now replace the current window.

Figure 4.13 Perseus Menu.
The Current Assignment item will not appear on the Perseus pull-down menu unless you have created a new stack which you have named Current Assignment.
Please read chapter 10.6 to find out more about implementing the Current Assignment feature.
You first must identify the hard disk location of the Notebook stack by using the Settings feature from the Gateway. This procedure is described in section 4.2 above. Chapter 10, Saving Your Work, describes the use of the Notebook.

Figure 4.14 Slide Shower.

Figure 4.15 Save List dialog window.
Any number of Paths may be stored in a personal Path stack. The card listing the Paths kept in the stack is called the Path Index. The Current Path is that Path presently loaded into Perseus, the one which you have chosen to follow. The Current Path card contains a series of icons representing the various Stops on the Path.
This menu item is the same as clicking the center of the Path Navigator on the Navigator Palette.
If you are following a Path, but have left it to explore Perseus on your own, you can rejoin the Path where you left it by choosing this item.
If there is no Current Path, Perseus will put up a message window telling you so. Choose a Path to follow from the Path Index.
This is the electronic location where you choose or edit the Current Path. Alternatively, you may use the Change Path feature, below.
A dialog box appears listing all paths (if any) in your version of Perseus. Click on the Path you wish to follow.
NOTE:Please be sure that the player is attached via your computer's modem port.
A small window with controls for the videodisc player appears (figure 4.16). Use the window to test connections to the player, if one is being used, to bring up a desired image, or to move forward and backward in the videodisc. The ability to bring up a specific image also works with the digital images on the cd-rom(s).

Figure 4.16 Video Controller.
Locate the cursor in the field Archive No. and type in the Perseus archive number 1990.01.003. Press Return.
All Perseus images have an archive number. The archive number for videodisc images is found in the catalog that comes along with your videodisc. For images stored on the cd-rom(s), the archive number appears in the title bar of the image. The caption and credits (if applicable) are shown for the current image.
NOTE: Perseus archive numbers are not the same as the frame numbers of images on the videodisc. Perseus archive numbers are permanent, but videodisc frame numbers change from one version of Perseus to another.
> Click Show Info for Current Image to obtain the Perseus archive number for the image displayed on the video monitor.

Figure 4.17 Videodisc Controller buttons.
> Use the Step and Scan buttons to continue a step or scan action.
In this manner, your search results are saved in a Perseus notebook. This is a somewhat more permanent record of your work, as the Search Saver is cleared whenever you make a new search or when you quit from Perseus. Read about the Notebook in chapter 10.3, Saving Your Work.
The use of the CD Swapper is covered fully in chapter 10.4, Saving Your Work.
> Choose the name of an open stack from the Perseus menu to go to that stack.
This menu feature is especially useful if you are using Perseus on a system that has a small monitor, or if you keep many stacks open at the same time.