

| If you are... | then be sure to read... |
| Evaluating your equipment needs | Section 2.1 on Hardware, Software, and 2.2 on Configurations |
| Installing Perseus the first time | Section 2.4 on Hardware Installation and Software Installation |
| Installing Perseus 2.0 and are familiar with Perseus 1.0 | Section 2.3 Quick Installation and Startup Instructions |
| Optimizing your Perseus configuration | Section 2.2 on Configurations |
| Changing your Perseus installation | Section 2.2 on Configurations |
| Having trouble starting up Perseus | Section 2, entire; 2.6 Troubleshooting |
| Having trouble opening images | Section 2.6 Troubleshooting |
Users of Macintosh computers belonging to the PowerPC family, please take note. A problem with the most recent PowerPC machines, i.e., those shipped as of Fall, 1995 with 8 MB of RAM installed, is that the system software eats up a tremendous amout of RAM, leaving only about 3.5 MB for Perseus. Thus, since Perseus 2.0 requires 5 MB of RAM to run well, you will need to add more memory. See the discussion on SIMMs chips in section 2.2 below.
Table 2.1 gives you a quick indication of the Macintosh models capable of running Perseus. You should also consult the more detailed technical requirements that follow.
| Macintosh Models | Satisfactory Performance with Perseus | Optimal Performance with Perseus |
| Mac LC family | X | |
| Mac II family | X | |
| Mac LC-based Performa family | X | |
| Mac Quadra-based Performa family | X | |
| Mac Centris family | X | |
| Mac Quadra family | X | |
| Mac PowerPC family | X |
Smaller and older Macintosh computers, such as the Mac Plus, Mac SE, and Mac Classic, are not recommended for use with Perseus because of their small 9-inch screens and their inability to display color digital images. The Macintosh Color Classic can display color images but is slow and has a small screen.
The Macintosh computer you select must meet certain minimum technical demands. An optimum configuration is one with a Macintosh Quadra, Centris or PowerPC computer and 24-bit color display. Detailed requirements for Perseus are shown in Table 2-2, below.
| Specification | Minimum | Optimum |
| Microprocessor | 68020 | 68040 |
| Hard disk | 7 MB minimum of free space available for hard disk files | 7 MB minimum of free space available for hard disk files |
| RAM | 5 MB allotted to Perseus Player | 8 to 20 MB allotted to Perseus Player |
| Color display | 8-bit color | 24-bit color |
| Monitor size | 13- or 14-inch color monitor | 17-inch color monitor, or dual monitors (at least one color) |
More hard disk space is required if you modify the primary configuration of Perseus by relocating CD-ROM information to the hard disk. This step speeds up the performance of Perseus, but it also substantially increases the required hard disk space (see section 2.2).
Many newer Macintosh models come with 16- or 24-bit color, e.g., the Performa 636. Other recent Macintosh models use VRAM (video RAM) expansion kits to upgrade the display capability to 24-bit color. Older Macintosh models use display cards to upgrade the display capability to 24-bit color.
When you are evaluating the monitor and color display requirements for your Perseus configuration, consider the audience who will be using the program. If the main use of Perseus will be the primary texts and philological tools, you may not need the ability to display images using millions of colors. If the main use is for art history or archaeological inquiry, you should probably have a configuration that provides for thousands or millions of colors (16-bit or 24-bit mode).
Another way to expand the available screen size is to use two monitors placed next to each other. The expanded screen size shows more windows and images simultaneously. In this configuration, one monitor can be color and one can be black and white. The computer treats the two monitors as one screen, where windows can be dragged from one screen to the other.
Although the Comprehensive Edition is a four-CD set, you do not need multiple CD-ROM drives to use it. Instead, the Perseus software keeps track of requests for data located on CD-ROMs other than the one currently in the drive, and it will prompt you to swap CD-ROMs (see chapter 5.4). If you have more than one CD-ROM drive, however, you can use them to reduce the amount of CD-ROM swapping required. Multiple CD-ROM drives are "daisy-chained" together, with each one appearing as a separate drive on the Macintosh desktop.
To connect the CD-ROM drive to your computer, you need a SCSI (Small Computer System Interface) cable, which is normally provided with the CD-ROM drive. You may also need an SCSI terminator, if you do not already have a terminated SCSI device attached to your Macintosh. Consult the technical documentation for your CD-ROM drive for more information on connecting the drive to your computer. (See also CD-ROM software drivers and accelerators, below.)
Possible options for the player include: Pioneer 4200, Pioneer 6000A, Pioneer 6010A, Sony LDP 1200, Sony 1500, Sony 2000, and Hitachi 9550. Any standard video or TV monitor will work, but models with video input jacks are much easier to use than models without such jacks.
You will need audiovisual cables to connect the videodisc player to the monitor and a computer interface cable to connect the player to the Macintosh. The player-to-monitor cable is a standard one if the monitor has built-in jacks, and the right connectors may be bought at any electronics store. The computer interface cable should be purchased with the player. They can also be purchased from some specialized dealers
Each player is different, and cables are not interchangeable. For example, a cable made for a Pioneer videodisc player will not work with a Sony videodisc player.
The Perseus Installer software will automatically set the memory partition of Perseus Player to the minimum amount required for Perseus (see section 2.3).
GreekKeys 7.0 is a keyboard program, designed for the Macintosh, that enables you to type accented Greek letter fonts with a standard Macintosh keyboard. Greek letters are paired with keys on the keyboard, and diacritics are created by pressing the Option key in combination with a letter key.
Perseus does not hold any rights to GreekKeys and therefore cannot distribute it. GreekKeys 7.0 may be purchased from Scholar's Press Customer Services, P.O. Box 6996, Alpharetta, GA 30239-6996, 1-800-437-6692.
There is a brief discussion on typing Greek in section 8.4.1. The Greek alphabet, its transliteration into Roman characters, and its GreekKeys equivalents may be found in Online help under the Stack Topic, The Greek Alphabet.
System software enhancements can also be installed to accelerate the performance of the CD-ROM. These enhancements increase the access speed and/or transfer rate between the computer and the CD-ROM drive. Some enhancements can increase the speed by 50 percent or more. A list of some CD-acceleration utilities is presented below, although it should not be considered comprehensive. Investigate the availability of CD-ROM system enhancements through your system administrator or local software distributor.
The Perseus Project has not thoroughly tested these enhancements and does not guarantee their performance or reliability. Some software builds permanent files which must be discarded before upgrading from version 1.0.
When you are using a single computer, there are several ways to optimize it for Perseus. The primary way is to select a fast computer (such as a Centris) and fast CD-ROM drive. As of this writing, the Apple CD-300S is a good choice for a CD-ROM drive, with an access speed of 300 KBps.
You can also add random-access memory (RAM) to the total available memory. More RAM will allow you to allocate a larger memory partition to Perseus Player, so that you can open more stacks and images at the same time. The preferred way to do this is to add Single Inline Memory Modules (SIMMs). Beyond 16 MB the computer will not run any faster; the advantage to expanding RAM above that level is the ability to run other applications simultaneously with Perseus. You can try using System 7's virtual memory facility to expand the total available RAM, although results produced by this method are significantly slower than adding hardware RAM. The RAM partition of virtual memory cannot exceed the amount of free space on the computer hard disk.
Another way to optimize your system is to place frequently-used parts of Perseus on the hard disk, which allows faster access than the CD-ROM drive. The size of the hard disk will determine how much information can be relocated. For more information on this option, see Installation below.
You may also use Perseus in a network configuration. The contents of the Perseus CD-ROMs or the CD-ROMs themselves can be placed on dedicated file servers accessed through workstations linked to the network. If you plan a network configuration for Perseus, be sure to have enough disk space to accommodate the information on all the CD-ROMs of Perseus, about 2 gigabytes.
Advantages of a network configuration are that several people can use Perseus at the same time, access time will likely be faster (depending on the network), and you might save money on hardware. (If you run Perseus on a network, you must have a network license. Contact Yale University Press for network licensing information.)
The information below provides some detail on alternative configurations for Perseus. The most effective way to use the information is to skim it for an overall understanding, then read it in greater detail when you have become familiar with Perseus. If you are a novice computer user or a first-time user of Perseus, you should also read the rest of this chapter for more complete information. If you are an experienced computer/Perseus user, review this section for suggestions on ways to improve your configuration.
This configuration requires a computer, color monitor, and CD-ROM drive, at minimum. In a typical configuration, an individual runs Perseus by using the minimum required files from the hard disk (about 7 MB) and drawing all other information and images from the CD-ROMs.
If this is your configuration, you should consider adding CD-ROM accelerator software to speed up performance of the CD-ROM drive. These enhancements are described in section 2.1.2.
The Installer automatically decides which folders to copy to your hard disk.
An advanced reconfiguration of a Perseus system involves moving selected elements of Perseus to the hard disk based on the information that will be used most frequently. This step is like the previous suggestion for moderate reconfiguration but it requires a more selective process of relocating Perseus elements and a firm understanding of search paths. The advantage is faster operation. The disadvantages are a more demanding installation procedure and the need to know which parts of Perseus you will use most often.
Perseus files consist of HyperCard stacks, drawings, photographic images, QuickTime movies, and data base files. In the moderate reconfiguration described above, you move entire folders containing Perseus elements. In the more advanced reconfiguration, you go through a more selective process to identify stacks, images, and data base files to copy from the CD-ROM to the hard disk.
If you call the same images repeatedly in your use of Perseus, you may want to copy some image folders to the hard disk. Images are grouped in folders according to their collection, and must be copied only one folder at a time. Section A.1 of the appendix contains a list of folder names and their contents. Identify the image folders you want to relocate and copy them to the hard disk. Copying folders from the CD-ROMs to the hard disk requires an adjustment to the Home stack to change the search paths. Read the subsequent section in this chapter for information on the Home stack and search paths.
Folders containing images may be copied to the hard disk, but do not remove images from their folders or rename them, or else Perseus will be unable to find them.
If you use the same elements of Perseus repeatedly, for example, selected authors, you may want to move the pertinent data base file from the Text Databases folder on the CD-ROM to the hard disk. This step will speed up access to the selected elements of Perseus. Just as you must change the Home stack search paths when you relocate an image folder, you must also change a special Perseus search path when you relocate a database file. Section 10.5.4, Detailed Configuration, offers more information on how to change the file data base. This type of modification should be undertaken only after you are comfortable with file names, disk locations, and search paths.
These configuration strategies are best suited to the single-user, single-computer model. In many cases, particularly in instructional settings, more than one person or group will need to use Perseus at the same time. For solutions, read the network configuration descriptions below.
There are two main types of network protocols: LocalTalk and Ethernet. LocalTalk is an inexpensive network option, but it is slow. Ethernet is much faster, and many recent Macintosh models have built-in Ethernet cabability, but it requires more expensive cabling. Ethernet can support many more simultaneous users than LocalTalk.
Several CD-ROM drives can be placed on a network as servers. This is of advantage only if you already own the CD-ROM drives. With the price of ROM falling, it is cheaper and faster to copy the contents of the CD-ROMs onto large hard disks that will be file server(s). (A 2.0 gigabyte drive can be bought for around $1000, 4.0 gigabytes for around $1700.) You must have hard disk space for approximately 1.8 gigabytes (2,000 megabytes) of data from the CD-ROMs.
A combination of CD-ROM drives and hard disks may be used. Just make sure that there are enough CD-ROM drives and/or hard disk space to provide access to all information in Perseus at the same time.
When you copy Perseus from the CD-ROMs to the file server disks, make sure the folders retain their original names. List the disk name and folder locations in the local Home stacks. All HyperCard stacks that are originally locked should remain locked.
The Home stack on each computer must list the image folders, the Atlas folder and Local Stacks. Everything elso is listed in the Gateway. The most efficient method of ensuring an accurate Home stack is to modify one Home stack with all the appropriate search paths for the file server folders. Copy that Home stack on each local computer, and make the appropriate changes to each local Home stack to reflect the name of the local hard drive.
A common challenge in network configurations is the security and stability of the data. Network administrators will be aware of software that protects the data from unintended modification and intentional tampering. For Perseus to work, however, it is essential that the stacks in the folder Local Stacks remain unlocked.
Follow these instructions to get Perseus 2.0 running right away. More detailed installation and startup instructions are given in section 2.4 .
The following steps assume a familiarity with Macintosh hardware and operating system. Also, these instructions apply only if you are using Perseus on a single system, not networked. If you are using a videodisc player, follow the hardware instructions in section 2.4.1 and the Settings intructions in section 2.4.2.
* Switch on the CD-ROM drive (if it is an external one) and the videodisc player (if using one), boot up the computer and load the CD-ROM Perseus Disk 1 (or the Concise Edition Disk).
Be sure to turn on the CD-ROM drive and videodisc player before turning on the Macintosh.
NOTE: If you will be swapping CD-ROMs, please be sure to turn off File Sharing in the Control Panels of your Macintosh. Otherwise the Mac will not eject the cd.
* Create a new folder on your hard disk to contain Perseus software to be copied to your disk. Name it Perseus 2.0.(or whatever else you want, but it is so named herein).
* When the Perseus Disk 1 icon appears on the desktop, open it.
* Double-click the stack Perseus Installer.
* When the Perseus Installer appears (figure 2.1), click the button appropriate to the amount of free space in your hard disk.
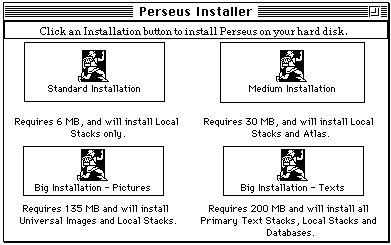
Figure 2.1 Perseus Installer
The two Big Installations may take over an hour, depending upon your equipment.
* A dialog window appears asking Do you want to create a new folder for Perseus? If you click Yes, you will be asked to type in a folder name after the next step. If you click No, the Installer will copy a folder called Local Stacks to your machine.
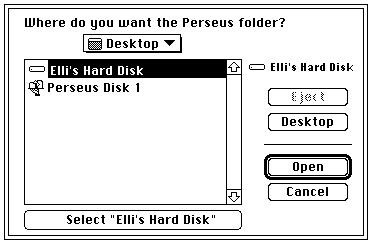
Figure 2.2 Installer dialog window.
* A third dialog window appears asking Name of new folder. The default name is Perseus 2.0, or you can type in a name of your choice, then click OK.
* When the installation is complete, the Installer will automatically quit.
* Make sure you have copied the folder Local Stacks from Perseus CD 1 to your hard drive.
* Click on one of the eight fields for non-image resources at the top and choose the installation location from the dialog window.
* Click Choose, select the image folders you wish to copy, then choose the locations from the dialog window. Do not remove individual images from the folders.
* When you have finished relocating resources, click Set up Gateway.
* Click Reset to return the settings to the cds.
* Do not name any of the partitions Perseus Disk 1, etc. This is because of software limitations.
To start up Perseus 2.0, do the following:
* Open the folder you have designated for Perseus.
* Open the folder Local Stacks.
* Double-click the stack Perseus Player.
THIS PROCEDURE IS NEW FOR PERSEUS 2.0. DO NOT START UP BY DOUBLE-CLICKING THE PERSEUS GATEWAY.
After an interval, the Gateway and Navigator Palette will appear (figure 2.3).
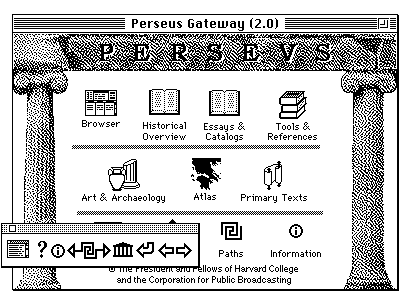
Figure 2.3 Perseus Gateway with Navigator Palette, lower left.
While working in Perseus, you only need to single-click the mouse.
Perseus 2.0 is now ready to use. The Navigator Palette may be dragged out of the way. Please remember that you can always return to the Gateway by clicking the Gateway (temple) icon on the Navigator Palette.
To quit Perseus, choose the item Quit from the File menu, or press the keys command-q.
Here are two tasks you may want to complete before exploring Perseus 2.0.
> Duplicate the Paths, Notebook and CD Swapper stacks and personalize them by renaming them, for example, "Elli's Paths" and "Elli's Notebook."
By renaming these stacks, you can distinguish your Paths and Notebooks from those of other users. When you start Perseus, you will need to identify the location of these stacks through the Settings option, available from the Gateway. More information on Settings is in section 2.4, detailed descriptions of Path, Notebook and CD Swapper procedures may be found in chapter 10, Saving your Work.
> Make an alias of the Perseus Player and keep it in a convenient place in your computer.
For more detailed instructions on installation of hardware and startup, read the following sections.
If your CD-ROM drive is external, it will be attached to the computer with a SCSI cable. A number of hardware devices (hard disk drives, scanners, etc.) may be linked together in a SCSI cable chain. One of the ports of the device at the end of the chain must have a terminator plugged into it. The CD-ROM drive documentation should describe proper cabling. In some cases, the terminator must be plugged into the same port as the cable, in others into the top or bottom port. If you have difficulties, consult your hardware documentation and try altering the configuration.
> Install the proper CD-ROM software drivers on your Macintosh system.
Your CD-ROM drive documentation should explain how to install this software.
CD-ROM drivers are not universal. If an Apple CD-ROM machine has been replaced with one built by another manufacturer, it will be necessary to install the proper driver software.
> Connect the videodisc player to the video monitor (if the videodisc is used).
If you are using a video monitor, this equipment is connected through audiovisual RCA cables. Other cable configurations are required for monitors without RCA input jacks.
When you put the videodisc into the player, you should see the color test bars on the monitor screen. If the player has front-panel controls, you should be able to check the connection by stepping through some images on the videodisc.
> Connect the videodisc player to the Macintosh (if the videodisc is used).
Use the correct cable to connect the communications port of the videodisc player to the appropriate port on the Macintosh. The appropriate cable is often provided with the videodisc player; if it is not, consult your local dealer. Check the baud rate setting on the videodisc player. The correct setting for computer interface should be specified in your videodisc player documentation.
NOTE: If you will be swapping CD-ROMs, please be sure to turn off File Sharing in the Control Panels of your Macintosh. Otherwise the Mac will not eject the cd.
> Double-click the Perseus Player icon in the Perseus/Local Stacks folders you installed on your hard drive.
Never double-click the Perseus Gateway if you are starting up from the Perseus Player. Do not start up by clicking on another stack, or else Perseus will not operate properly. If you encounter problems, start up using the System 7 procedure of dropping the the Gateway onto the HyperCard application.
As Perseus initializes, the cursor changes to a watch, the Home card flashes on the screen, and the Perseus Gateway appears on your screen along with a small floating window, the Navigator Palette. Once the cursor becomes the hand or the arrow, Perseus is ready for use. You can move the Navigator Palette out of the way by holding the mouse down on its title bar and dragging it to a convenient part of the screen.
The Navigator Palette contains eight buttons which issue commands to help you make your way around the Pereus environment. Because the Navigator Palette is a floating window, it remains on screen and active although another window may also be active.
If the Navigator Palette disappears, you can select Navigator from the Perseus menu to reactivate it.
In addition to the menu bar items that normally appear in HyperCard (File, Edit, Go, Tools, Font and Style), two new items appear in the menu bar, Links and Perseus. The resources and databases contained in Perseus are accessed both through the Gateway icons and through the Links menus.
You can always return to the Gateway by clicking the Gateway (temple) icon on the Navigator Palette.
To quit Perseus, release the mouse on the item Quit under the File menu, or press command-q.

Figure 2.4 Settings Card.
* Select a player type by releasing the mouse on the item under the pop-up menu corresponding to your model of videodisc player.
* Click the button Use Video Images, to the right.
* Return to the Gateway by clicking the Gateway (temple) icon on the Navigator Palette.
A general overview of Settings may be found in chapter 4.2.2. For detailed instructions on Settings, please see chapter 10.5.
NOTE: We can recommend only the videodisc players listed in chapter 4.2.2 and on the Settings card. Other models may not be compatible with Perseus.
To learn the basics of Perseus, please turn to the next chapter, where a number of illustrative exercises in all facets of the database are given.
If you encounter problems with starting up Perseus, please see below on HyperCard issues and section 2.6, Troubleshooting.
The Perseus database is built upon HyperCard, a Macintosh application that stores and accesses data through an interface analogous to a "stack" of note cards. HyperCard launches itself from the "Home" stack each time the application is opened. You need to know almost nothing further about HyperCard to use the Perseus program, but you might need to learn a few things to set up your configuration.
Perseus Player should remain permanently in the Local Stacks folder on the hard disk. The Player stack does many things, but one of them is especially important for Perseus: establishing the search paths. The search paths make it possible for Perseus to locate specific pieces of information from the large universe of data, and they provide a prioritized structure for data searches. Thus, for example, search paths in the Perseus Player stack tell HyperCard where to find the image folders that contain the digitized photographs.
Do not place a HyperCard Home stack or stacks from Perseus 1.0 inside the Perseus Local Stacks folder. This will impair or prevent the successful use of Perseus, because Perseus may begin to use inappropriate search paths from the other Home stack.
The default memory partition of Perseus Player has been set at the minimum amount of memory required to use Perseus. If you have not already done so, go to the Finder, select Perseus Player (but don't double-click), then choose Get Info from the File menu. Check the memory partition of Perseus Player in the Get Info box and if necessary update it to at least 5 MB, if that much is available.
Open the Perseus Player stack by double-clicking it. The stack contains 6 cards. You can go forward in the stack by clicking on the arrow in the lower right corner and backward by clicking on the arrow in the lower left. Click forward to the fifth card of the stack to see the search paths for documents (a button called "Documents" on this card will be highlighted).
You will see a long list of Perseus image folder names listed in the document search paths. If you have changed your configuration, change the pertinent part of the search path here. Note that each line in the list of search paths ends with a colon. An example of this procedure is as follows, assuming that the Atlas and two image folders previously have been copied to a folder named Perseus 2.0 on a hard disk named Elli's Hard Disk:
Default search paths for documents:
Perseus Disk 1:Atlas:
Perseus Disk 2:1987.01.1s:
Perseus Disk 2:1987.01.1t:
Renamed search paths for documents:
Elli's Hard Disk:Perseus 2.0:Atlas:
Elli's Hard Disk:Perseus 2.0:1987.01.1s:
Elli's Hard Disk:Perseus 2.0:1987.01.1t:
The original search paths for documents can always be restored by repeating the installation proceedure.
| Symptom | Possible Cause(s) |
| Start up messages about inability to find files, asking "Where is ..." or error messages reporting "This operation has failed because an error has occurred." | Drop Gateway onto Perseus Player or HyperCard application Multiple copies of Home stack exist on hard disk, and Perseus is using one with inappropriate search paths Home stack search paths are not listed correctly Computer configuration changed without updating the Home stack search paths Perseus 2.0 folder missing necessary files |
| Path or Notebook not accessible | Location of Path or Notebook stack not yet identified through the Settings option |
| Path stack locked | Paths stack being used from CD-ROM instead of hard disk |
| Memory message or spontaneous quitting of application | HyperCard memory partition set too low |
| No digital images found | CD-ROM not properly connected to computer Home stack does not have correct paths to images |
| Cd will not eject | Turn off file sharing in control panel |
| Quadra system crashes | Font problem |
| Greek type font is very small or missing the lower dots | Font problem |
In the Perseus 2.0 folder, click the Perseus Player icon once while the application is not in use and choose Get Info from the File Menu. The lower right-hand corner of the dialog box contains a number that reflects the current memory setting. Type "5000" into the box, or type a larger number if your computer has sufficient available RAM, as described above.
If the Perseus Disk 1 icon does not appear on your desk top, try restarting all hardware, taking care to turn on the CD-ROM drive without the disk in it, then turn on the computer and when it is finished booting up, insert Perseus Disk 1 into the CD-ROM drive. If the icon still does not appear, try switching places of the SCSI connector and the terminator in the CD-ROM ports. Finally, check the Extensions folder in your System folder to make sure that the Apple CD-ROM extension is there for an Apple CD-ROM player, or that the appropriate extension is there for another manufacturer's CD-ROM player.
If you are using a videodisc player and cannot display images from the videodisc, check the cable connections and confirm that you are using the appropriate cable. Check the baud rate setting on your videodisc player (specified in the player documentation).
A related problem may be the existence of multiple copies of the Perseus Player stack. The Perseus Player is very important in using Perseus, because the Perseus Player stack specifies the location of files and instructs HyperCard where on your hard drive to look for Perseus data. Double-click the Perseus Player icon from the Macintosh desktop and move forward in this stack (by clicking the lower right hand arrow) until you see the list of search paths for stacks, applications, and documents. Check that the search paths are specified correctly in relation to your software configuration.
If you see the error message "Cannot open MDB Index," check the path names in the correct version of the Perseus Player documents card.
If you are unable to type accented Greek, check that SMK GreekKeys 7.0 has been installed in your system. The Greek fonts Symbol and Super Greek are incompatible with GreekKeys and Perseus 2.0.