

Both newcomers and users familiar with Perseus 1.0 will want to take advantage of the new Online help (section 3.3). A detailed discussion of Macintosh and HyperCard techniques as they apply to Perseus will be found in chapter 4, Navigation, and chapter 5, Searching.
Users unfamiliar with operating the Macintosh should read about Buttons, Pop-up Menus and Pull-Down Menus in chapter 4.1.
The Perseus interface is what you see on the screen after you have started up Perseus on your computer; the interface contains the means by which you interact with the database (by clicking the mouse on buttons or releasing the mouse on menu items, for example); the interface also determines the particular format in which information (a text or a vase, for example) appears on the screen.
You gain access to the Perseus databases by descending through several levels of the interface. The first or uppermost level is the Perseus Gateway (figure 3.1). By clicking an icon on the Gateway, you can enter one of the databases in History, Art & Archaeology, Primary Texts, etc.
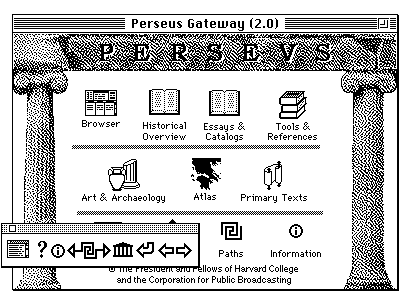
Figure 3.1 Perseus Gateway with Navigator Palette, lower left.
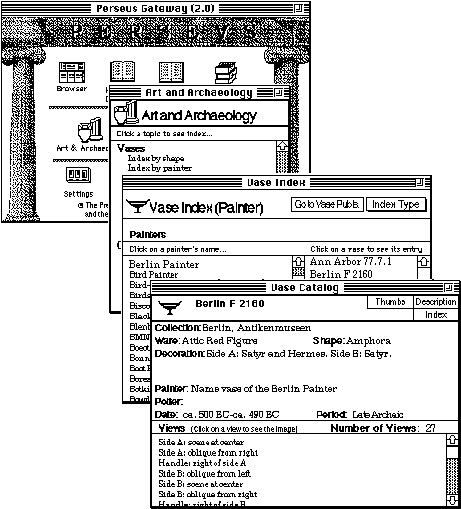
Figure 3.2 Interface levels from Gateway to Vase Catalog.
Perseus Gateway ==>
Art & Archaeology Index card ==>
Vase Index card ==>
Vase Catalog card (containing a list of images and the documentation for a
particular vase) ==>
Image.
If you were looking for Greek-English texts, the route would be:
Perseus Gateway ==>
Primary Text Index card ==>
Author ==>
Work.
The following tasks have been designed to familiarize you with the Perseus
environment. You will bring up a famous vase painted by Douris, then explore
links from the Historical Overview of Greek History by Thomas Martin. You will
next access the text of Homer's Iliad, go to the passage describing
Achilles's shield, analyze the verb form  , and search for Homeric
uses of the word
, and search for Homeric
uses of the word  . The final task makes use of the Atlas to plot
the site of Athens on a color map.
. The final task makes use of the Atlas to plot
the site of Athens on a color map.
Perseus users often achieve good results working in groups. You may find that a cooperative effort works well here, with you operating the computer controls and a partner reading from the User's Guide.
> Bring up images of a Kylix painted by Douris (Berlin F 2285).
From the Gateway, click on the Art & Archaeology icon. The Art & Archaeology Index card appears (figure 3.3). This card contains five topics: Sites, Architecture, Sculpture, Vases, Coins.
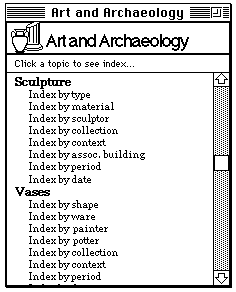
Figure 3.3 Art and Archaeology Index.

Figure 3.4 Vase Catalog card.
One of Perseus's strengths is its ability to display objects in detail. Scroll down and click on the following images: Tondo: Staff; Side A: man on stool; Side B: teacher and student with stylus; Side B: school.
Along with the image, a floating window will appear with the photo credits. The credits window may be closed or dragged out of the way. You may wish to bring up other images of this vase. To do so, make the Vase Catalog card active by clicking on it, then click on another view.
You can look at several images at one time, but be aware that images consume memory. Perseus will remind you when your machine is getting low on RAM. Please be sure to close the image before moving on.
To read a description of the vase, click on Description in the upper right corner of the Vase Catalog card. To return to the Gateway, click on the Gateway (temple) icon on the Navigator Palette.
For further information on Vases, see chapter 6.3.5.
> Learn about Pericles's Acropolis from the Historical Overview.
From the Gateway, click on the Historical Overview icon. A card TRMartin History TOC appears. Scroll down the outline to item 9.4.4 Pericles's Acropolis, and click on it. Perseus will take you to the corresponding section of Martin's narrative history.
The text contains links with other resources in the Perseus database; to see the links, click on the button See Links/Lock Text in the upper right.
This is a toggle button. Its name switches between the modes See Links/Lock Text and Hide Links/Unlock Text depending on which mode it is set at. To select and copy text, you must use the Unlock Text setting.
It will be observed that several words or phrases in the text are now underlined. Find the phrase Athenian Acropolis and keep the mouse clicked down on it. A pop-up menu appears offering three choices (figure 3.5).
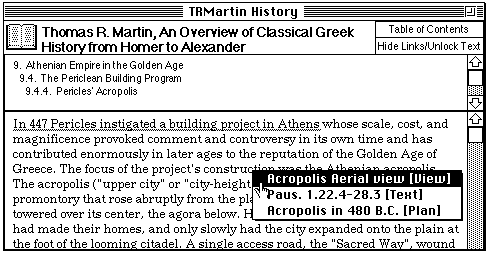
Figure 3.5 Historical Overview showing link at Athenian Acropolis.
In the interest of saving space and memory, please be sure to close any images before moving on.
For further information on the Historical Overview, see chapter 6.1.
> Bring up the text of Homer's Iliad.
From the Gateway, click the Primary Texts icon. The Primary Text Index appears (figure 3.6), with a list of authors in the field to the left.

Figure 3.6 Primary Text Index.
The example will continue with more illustrations from the text of the Iliad; or if you choose, you can return to the Gateway by clicking the Gateway (temple) icon on the Navigator Palette.
> Go to Iliad 18, Achilles's Shield.
From within the text of the Iliad, click on the button Go To (figure 3.7).
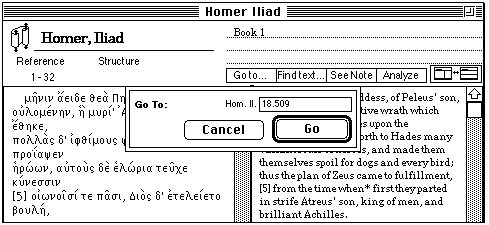
Figure 3.7 Primary Text with Go To feature.
> Use Morphological Analysis tool to parse the verb form .
In this exercise, you will be opening new windows for the Morphological Analysis Tool and the Lexicon. Be sure to hold down the shift key down while opening new windows in order to retain the previous window.
In line 509, select (i.e., click-drag with the mouse) the word .
Click the button Analyze (figure 3.8).
Note that you must select Greek text by dragging the mouse, not by double-clicking.

Figure 3.8 Primary Text with Morphological Analysis tool.

Figure 3.9 Morphological Analysis tool.
 and do not have a Greek
dictionary handy, select and release the mouse on Greek-English
Lexicon under the pop-up menu Related Tools, upper right.
and do not have a Greek
dictionary handy, select and release the mouse on Greek-English
Lexicon under the pop-up menu Related Tools, upper right.To return to the text of the Iliad , slowly click the Go Back (bent) arrow on the Navigator Palette twice. (The first click takes you back to Morphological Analysis.)
> Use Greek Word Search tool to find occurrences of in Homer.
It will be necessary to obtain the nominative form of this word in order to do
the search. Follow the Morphological Analysis procedure given above: select
the word  from line 509. Click the button Analyze. From
the Morphological Analysis card, select and release the mouse on
the item Greek Word Search under the pop-up menu Related Tools, upper
right (figure 3.10)
from line 509. Click the button Analyze. From
the Morphological Analysis card, select and release the mouse on
the item Greek Word Search under the pop-up menu Related Tools, upper
right (figure 3.10)

Figure 3.10 Morphological Analysis to Greek Word Search.

Figure 3.11 Greek Word Search tool.
Although you have entered the nominative form, because you have chosen to make an All forms from a Dictionary Entry search, the oblique forms will also appear in the results.
Click on the Do Search button, and forms for will appear
in the field lower left.
Note that ambiguous forms are indicated with a dagger. In this case,
 is daggered because it might come from
  .
.
To get a list of all citations for in Homer, release the mouse on
Citations for All Forms under the Options pop-up menu. To go to a
cited passage, highlight the desired passage and click the Go To Text
button. To return to Greek Word Search, click the Go Back arrow on the
Navigator Palette.
Note that the results of your search will have been erased. You can click the Do Search button to redo the search, or you can save your work with the Search Saver, located on the left of the Navigator Palette. Please read about the Search Saver , chapter 4.1.
For further information on Primary Texts and Philological Tools, see chapter 8.
A note on HyperCard technique: when you are in the HyperCard application, it is only necessary to single-click the mouse. This is a departure from the standard Macintosh technique of double-clicking to open a document.
To begin the following examples, return to the Perseus Gateway by clicking the Gateway (temple) icon on the Navigator Palette.
> Plot Athens on a color map.
From the Gateway, click on the Atlas icon, or choose Atlas from the Links menu. The entry point for the Atlas, the Small Outline map, appears along with a new floating window called the Atlas Tools Palette. Now click the button Graphic Index of Maps. The Graphic Map Index, a black and white outline map of the Greek world with active tiles, will appear (figure 3.12).

Figure 3.12 Graphic Map Index, Atlas Tools Palette, Tile containing Athens.
 )
located in the lower right corner of the Atlas Tools Palette. Click on it to
expand the selection of Atlas Tools.
)
located in the lower right corner of the Atlas Tools Palette. Click on it to
expand the selection of Atlas Tools. To plot the site of Athens, scroll down the field Select Site(s) , and highlight Athens by clicking the mouse once on it. Now click on the button Plot selected sites, middle right, and Perseus will plot the site (figure 3.13).
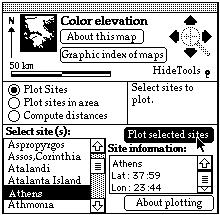
Figure 3.13 Atlas Tools Palette with Toggle showing tools, Athens selected from Select site(s), and Plot selected sites clicked.
If the Navigator Palette disappears, you can select Navigator from the Perseus menu to reactivate it.
For further help on the Atlas, see chapter 7.
The Browser may be described as an interactive catalog, a tool that enables you to quickly access and sort information from within the Perseus database. With the Browser tool it is possible to choose a database (Vases, Sculpture, Coins, Sites, and Architecture) and sort it based on a certain search context (Collection, Shape, Ware, Context, Painter, Potter, Period, Region or Keywords). Thus, in this example, you will make a search of Vases in Perseus 2.0 organized by Collection.
You can search the database for one of the 1,437 Keywords linked with the text, such as "Athena," "spear," or "love-making." When you choose the Keywords search context, a further pop-up menu appears to its right with 22 categories of Keywords from which to search. Many users find not only that the Keywords feature provides the most fruitful starting point for investigations, but that it is the part of Perseus which is "the most fun to play with." A further exercise using the Keyword search topic is found in chapter 4.5.1.
From the Gateway, click on the Browser icon. Perseus brings up the Browser interface (figure 3.14) on which you will see in the upper left a column of the five databases mentioned in the paragraph above (Vases, Sculpture, Coins, etc.).
Note that results obtained by other users may still be in the Browser, and the interface will not look exactly like the depiction in figure 3.14 until you actually perform the search.
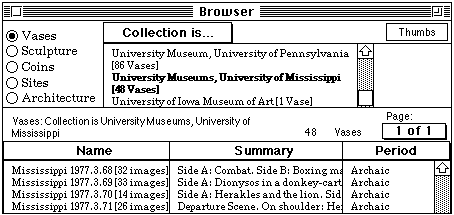
Figure 3.14 Browser tool, showing Mississippi Collection organized by Name.
If the search result Name does not appear, select Name from the pop-up menu at the top of the left column. Each of the three columns is headed by a pop-up menu. You can customize the display of search results by selecting the desired result from the pop-up menus. Note that only the left column of Browser results is active.
If part of the vase's Name in the left column is cut off, change the width of a column by holding the cursor at the top of the vertical dividing line and dragging to change the column width; note that the cursor changes from Pointer to Field-expander mode (figure 3.15).

Figure 3.15 Expand the Browser results column.
To return to the Browser, click the Go Back (bent) arrow on the Naviator Palette. Your search will remain in the Browser until you make another search or quit Perseus.
You do not need to return to the Gateway when navigating from one place to another in Perseus. You can directly access the Browser, for example, by releasing the mouse on Browser under the Links menu. The other Perseus databases and tools can be accessed directly from the Links menu as well.
For further information on the Browser, see chapter 5.1. To find out how to save the results of your search, see the discussion on the Search Saver tool , chapter 5.3.
> Use the Lookup tool to locate information about Akragas contained in the various Perseus resources.
The Lookup tool, reached via the Links menu, is a quick way to access information in Perseus. Lookup often will be among the first tools you use to start an inquiry; it is certainly the easiest to use: just type in a word or lookup string, press Return, and Perseus will list a number of options; click on an option and Perseus will take you there. (For a definition of lookup strings, see section 8.4.1.) The Lookup Tool draws on a database consisting of all English words indexed in Perseus, a number in the tens of thousands. Built into the Lookup tool is a list of alternate spellings, such as Clytemnestra/Klytaimestra or Aegina/Aigina, to 3. you reach the desired target.
From anywhere in Perseus, release the mouse on Lookup under the Links menu. A floating window appears (figure 3.16). The cursor should be on the left and blinking. Type Akragas and press Return.

Figure 3.16 The Lookup tool.

Figure 3.17 Lookup results
Click Site Catalog on the right. Perseus will take you to the Akragas card of the Site Catalog. (The Lookup window may be dragged out of the way.) From the Site Catalog card you can bring up Views of Akragas by clicking one of the lines at the bottom. To bring up thumbnail images of the Akragas views, a description of the site, or to go to the Site Index, click one of the buttons in the upper right.
Return to the Lookup window and try some of the other options Perseus has listed for Akragas. If it has disappeared, select Lookup from Links menu, type in Akragas again and press Return.
If you have a specific text or object in mind, you do not have to go through the various index levels to access it. Select Lookup from the Links menu. Type in what you want to find and press Return. Note that you must type in the name of the text or object according to the canonical list of Perseus contents found in Appendix B. For further information on the Lookup tool, see chapter 4.5.1.
For the following examples, it is assumed that you know how to start up Perseus and adjust the Settings. Please read about these procedures in chapter 2.4. To take the Guided Tours of Perseus 2.0, you only need to know how to use the Path Navigator (described below).
The Path Navigator is located on the Navigator Palette.

Figure 3.18 The Path Navigator on the Navigator Palette
To begin a Path, please read below.
NOTE! Both the Paths icon on the Gateway and the item Path Index under the Perseus menu will take you to the current Path stack as identified on your Settings card. To take the Tours, be sure that the stack "Paths" included in the Perseus 2.0/Local Stacks folder is your current Path (see chapter 10.5).
From the Gateway, click the Paths icon. The Path Index appears (figure 3.19).

Figure 3.19 Path Index.
A new window called Path Note will appear along with the first Location on the Path (figure 3.20). The Path Note window contains commentary or instructions concerning the Location. You may need to drag the foreground window out of the way in order to see the Path Note window.
Move the Path Note window to a location on the screen where it will not be obscured. Resize the Path Note window to accomodate the full text of the note.

Figure 3.20 First Location on Novice Tour, showing Path Note window.
Feel free to leave the Path at any time to explore the Perseus environment on your own. To rejoin the Path where you left it, choose Current Path Location from the Perseus menu. However, if you quit Perseus, you must again choose a Path to follow according to the instructions in this section.
To proceed forward along the Path, click the Go Forward arrow on the Path Navigator on the Navigator Palette.
For further information on customizing and creating your own Paths, and how to convert Paths from version 1.0, see chapter 10.2.
It is important to understand that the term "Stack" refers to the electronic place where data is stored in Perseus. "Stack" is the organizational metaphor for HyperCard, the software application on which Perseus is based. A stack is composed of a number of electronic "notecards."
> From the Gateway, click the Help (question mark) icon on the Navigator Palette.
When you request Help, information for the current stack appears (figure 3.21). Each icon on the Perseus Gateway represents a stack; 3. on the texts is given at the level of the Primary Text Index stack; 3. on Art & Archaeology is given at the level of the Catalog stack. The Help topic is shown at the top left, and the number of pages about this topic is shown at the top right.

Figure 3.21 Online Help for the Gateway.
Tips & Hints is an additional element of the Help system that offers techniques and reminders for a particular topic. This information will 3. you save time, avoid mistakes, and use Perseus more efficiently.
From any Tips & Hints card, you can see the Topic List or go directly to the stack being described. To return from the Tips & Hints card to the main Help, click Tips & Hints or the go back arrow at the top right.
> The Tips & Hints button toggles to read Main Help (while you are on the Tips & Hints card) . Click the button Main Help to return to the main Help.
> Click Topic List to see a content list of general topics and stack topics.
The general topics include Getting Started, Perseus Basics, and Utilities. The stack topics are grouped by Browsing Tools and Indexes, Art and Archaeology, Atlas, Primary Texts, Philological Tools, Historical Overview, References, and Supporting Information. Use the arrows to page ahead and back when the topic offers more than one page of Help.
> Scroll down in the Stack Topics list, and click Small Site Plans under the Art & Archaeology category.
Some Help topics, such as the Small Site Plans topic shown in figure 3.22, show diagrams of the Perseus screen being described.

Figure 3.22 Help topic with diagram
Any Help topic that describes a Perseus stack has a button that takes you directly to that stack from Help. General topics in Help do not have this button. A stack opened directly from Help opens in a new window rather than replacing the Help window, regardless of the setting registered on the Settings card.
> Close the stack you opened from Help (Small Site Plans).
> When you return to the Help topic for Small Site Plans, you may choose related 3. topics from the See Also... menu.
In this example of the Small Site Plans, there is one See Also topic, the Large Site Plans. Choose Large Site Plans to see the Help topic for that stack. You will go directly to the Help topic for Large Site Plans. Use the See Also... pop-up menu to see the related topics here.